सीएसआईआर-राष्ट्रीय भौतिक प्रयोगशाला
CSIR-National Physical Laboratory

Brief About New Facilities Created
- Robotic Mass Comparator
Advanced Robotic Mass Comparator of 5 g has been received at CSIR-NPL in 2020. Installation and commencing are under process. - Vacuum Mass Comparator
Vacuum mass comparator is a unique and state-of-art facility that serves both the fundamental research and highly accurate measurement in mass. The computer operated electronic vacuum mass comparator features a vacuum chamber and a load alternator with eight positions for holding masses as well as spheres (used as primary standards of density) and is capable of comparing mass against each other with highest accuracy. 1 kg vacuum mass comparator will be used to experimentally determine the air density by comparison weighing of buoyancy artefacts in air and vacuum.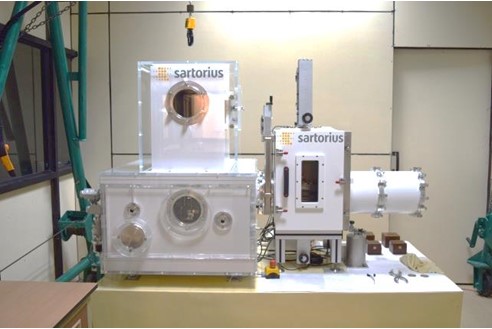
- 50 kg Mass Comparator
AX64004 is an automatic mass comparator which is based on computer operation, has four positions for weight alternator. It has a modern and fast weighing system. Independent draft shields protect from air current effect. The self-centric mechanism reduces the eccentric load errors.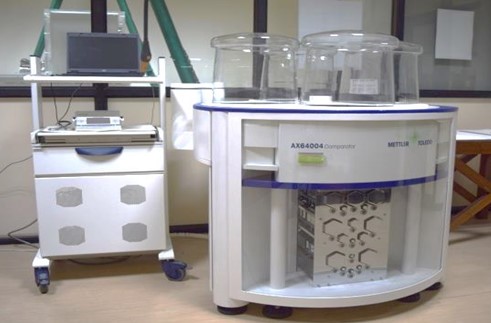
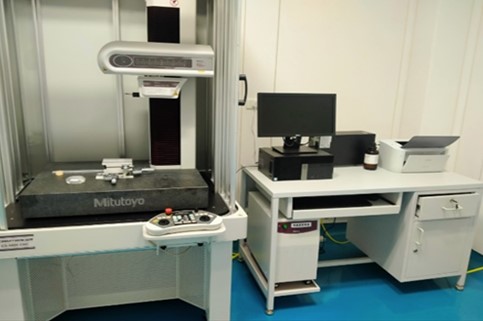
- A new stylus based surface texture parameters measuring instrument for surface roughness and contour measurements has been established in Length, Dimension and Nanometrology section. This instrument is capable of characterizing the surface of a workpiece for various surface texture parameters such as Ra, Rq, Rz, Rp, Rpmax, Rvmax, Rt, Sm, Sk etc. and contour features with resolution <1 nanometer, benefiting various manufacturing and automobile industries and helping us to increase the total number of our CMCs. This instrument has a working range of 200 mm in X axis with probe measurement range of 12 mm in Z axis. The resolution of measuring probe in Z axis is 0.8 nm and the motorized/ CNC column length in Z axis is 500 mm.
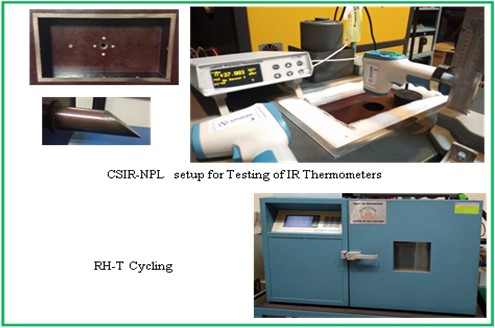
- Temperature and Humidity Metrology Section indigenously designed and developed facility for the Testing of IR Clinical Thermometers at CSIR-NPL as per Standard – IS/ISO 80601-2-56: 2017 and is being used for the testing of various IR clinical thermometers in this pandemic situation of COVID-19.
- We have designed and developed setup for calibration of clinical thermometers (mercury and digital) under a collaborative project with Legal metrology and the facility has been delivered at 2 RRSL labs.
- Set-up for testing of thermal imagers is being developed at CSIR-NPL. Till now, there is no such testing facility available in India to test the imagers imported from outside. This unique facility will support industries and laboratories for apex calibration and testing of thermal imagers.
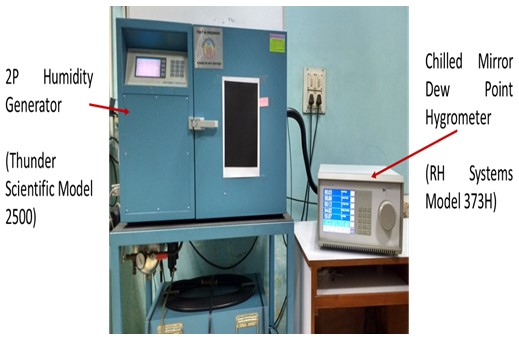
- Calibration facility for hygrometers has been set-up by procuring new humidity generator of Thunder Scientific-2500 based on temperature-pressure parameters with significant stability of better than 0.1% and capable of providing calibration in the range 10% to 95% RH with an uncertainty of 0.3% RH.
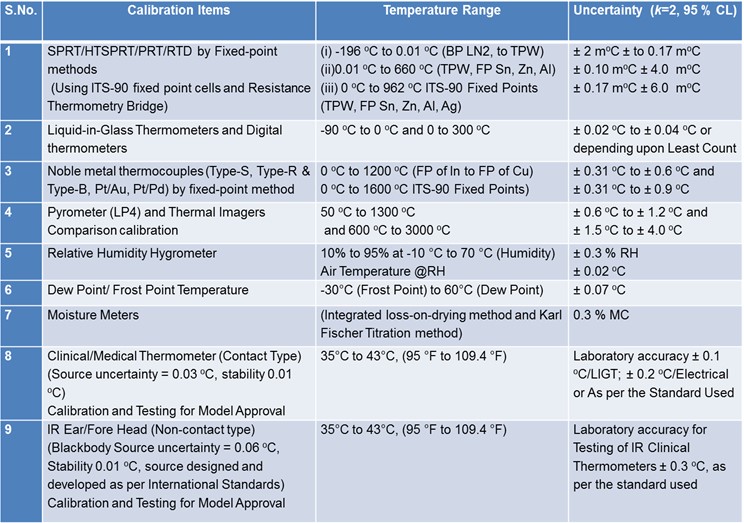
 Temperature, Humidity and Moisture measurement services are given below:
- Currently, Optical Radiation Metrology Section is working towards establishing a facility for calibration and LED based lighting. The project entitled “Creation of Testing and Calibration Facility for LED and LED based Lighting at NPL India as per National/International Standards” is jointly funded by BEE, Government of India and CSIR. The lab would house facility which would be instrumental to provide calibration, testing and consultancy services with respect to LED based lights. The laboratory would also be used to impart skill education in LED photometry through training. It would strengthen the measurement capability through international, bilateral and multilateral comparisons, Proficiency Testing and Inter-laboratory Comparisons.Under the BEE and CSIR funded project “Creation of Testing and Calibration Facility for LED and LED based Lighting at NPL India as per National/International Standards” two equipment have been installed very recently at CSIR-NPL.
(i) C-type Goniophotometer System: Under this program very recently a C-type Goniophotometer System has been established at CSIR-NPL for providing calibration and testing facility related to luminous flux and other parameters to industries, testing and calibration labs, R&D organizations etc.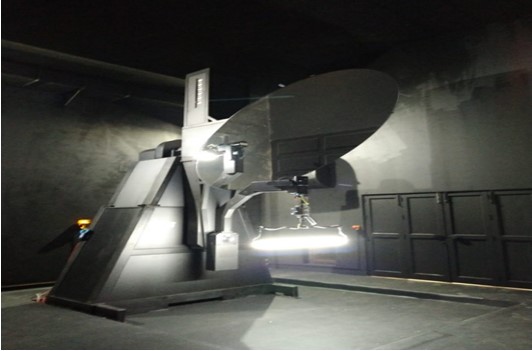
C-type Goniophotometer System
(ii) Optical Radiation Test System: With the advent of energy efficient LED lighting the concern for blue light hazard has also increased for which CSIR-NPL is establishing a facility for testing Photobiological safety of LED based luminaires.
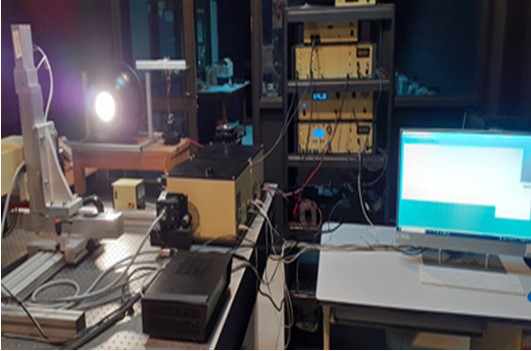
Optical Radiation Test System
Further, temperature dependent luminous flux maintenance testing is also envisaged to be established.
In very near future CSIR-NPL will establish a full-fledged laboratory for calibration and testing of LED lamps and luminaires. After installation the equipment will be prepared for disseminating calibration and measurement services as per national and international standards and international key comparisons. - CSIR-National Physical Laboratory has established several force machines including dead weight machines as the primary standard for the realization of forces and dissemination of the same to the user organizations in the range of up to 3000 kN having the uncertainty varying from 0.±002% to ±0.05% depending upon the method employed for the realization of the forces Since there is a great demand for the calibration of force transducer of higher capacity in the market, it has established a force calibration machine of 3000 kN capacity using a build-up system by comparison method in order to carter to the need of such industries and to provide the necessary traceability in measurement in such ranges as shown in the figure.
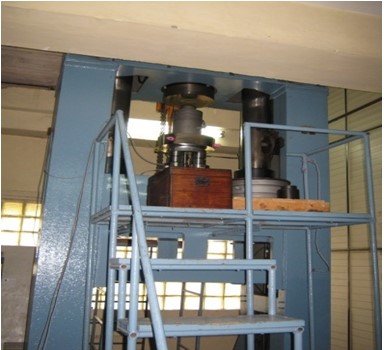
Build up System
- Ultrasonic Energy Meter Calibration Facility: Ultrasonic cleaning is being used widely in hospitals, industries and electronics manufacturing etc. The amount of ultrasonic energy radiated from the transducers ultimately causes the effective cleaning. Based the demand from industry we started working on the establishment of ultrasonic energy calibration facility with traceability to national standard.
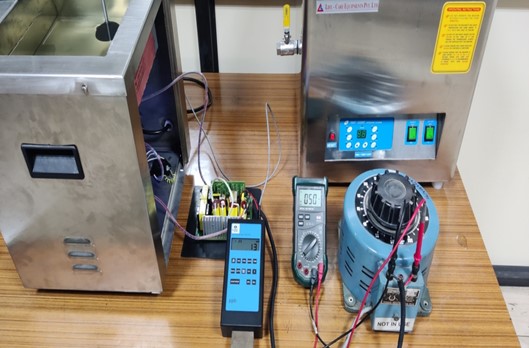
Snap showing the experimental setup of ultrasonic energy calibration facility
- Calibration/testing system for non-invasive blood pressure monitoring system: In 2019, Government of India amended the medical device rule of 2017 and added a list of 36 medical devices for which the type approval and related certification became mandatory. In this list, blood pressure (BP) monitoring devices (including digital type) is also present. At that time, the lack of proper infrastructure for testing facility of BP monitoring devices in India created an obstruction for the implementation of the amendment.
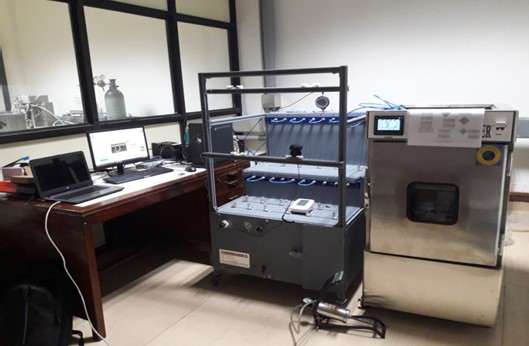
Calibration/testing system for non-invasive blood pressure monitoring system
- Acoustics and Vibration Standards, CSIR-NPL has revived the testing of DG sets (Upto 1000KVA) for Type Approval (TA) and Conformity of Production (CoP) w.r.t noise parameter. In the revised Gazette notification (Regd. No. D. L. – 33004/99, part 2, section 3, Sub-Section (i), No. 52) of MoEF issued in January 2018, CSIR-NPL is designated as certification agency for DG sets testing TA and CoP for Noise Level Compliance of different types of DG sets run on Diesel, Petrol and natural Gas (NG) or Petrol and Liquid Petroleum gas (LPG), etc.
- The Fluid Flow Metrology Section of NPLI has three facilities, namely, Primary Water Flow Calibration Facility, Primary Water Meter Testing Facility and Gas Flow Calibration Facility. The Section provides testing and calibration services of various types of water and gas flowmeters.
- The Gas Flow Calibration Facility has been established in the flow range 1 mL/min to 1200 L/min with expanded uncertainty of 0.2% at k=2. The Gas Flow Calibration Facility is essentially consisted of laminar flow elements, sonic flow elements, high precision flow display device named as mass flow terminal, molstic for mounting laminar, sonic and device under calibrations along with associated instrumentation such as barometric pressure monitor and digital thermometer (PT-100 sensor with indicator). The air compressor system having 1000 L capacity air receiver and 1250 L/min flow range is used to supply dry air to the flow elements. There are five numbers of laminar flow elements (i.e. 10 sccm, 100 sccm, 1 slm, 10 slm and 30 slm) which cover the flow range of 0.8 sccm to 50 slm with operating pressure of 100 kPa absolute to 525 kPa absolute. There are three numbers of sonic nozzles (i.e. 2E2-S, 5E2-S and 2E3-S) which cover the flow range of 10 slm to 1200 slm with operating pressure of 50 kPa absolute to 600 kPa absolute which uses vacuum pump for realizing the flow below 30% of full scale (FS) rating of sonic nozzle. The laminar and sonic nozzle are known as molblocs in Fluke terminology. Each molbloc has 2 nos. of built-in PT-100 sensors. The molbloc has one EEPROM chip which stores information like flow range, calibration coefficients, different types of calibration, etc. The output of laminar and sonic nozzle is read by mass flow terminal. The mass flow terminal is a high precision display device which consists of two nos. of high precision absolute pressure sensors (reference pressure transducers) for reading the upstream and downstream pressure of laminar and sonic flow elements. The terminal has two numbers of PT-100 sensor indicators for gas temperature measurement. The pressure, temperature and NIST gas reference property data are used to realize the flow.
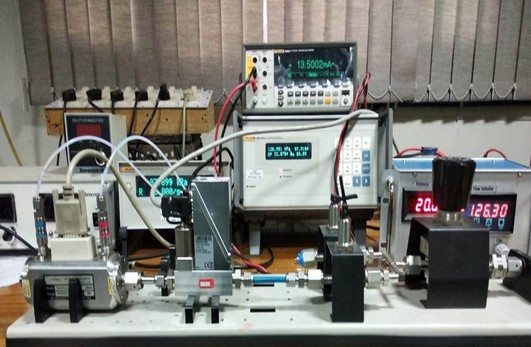
(a) Set-up showing calibration of mass flow controller using Gas Flow Calibration System
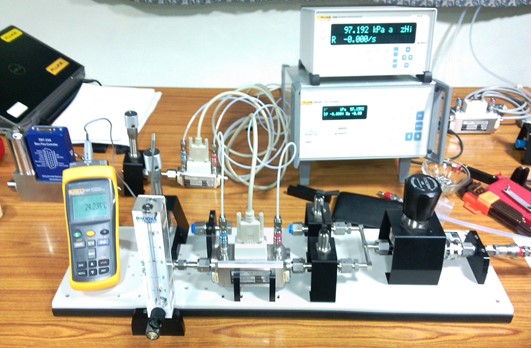
(b) Set-up showing calibration of rotameter using Gas Flow Calibration System
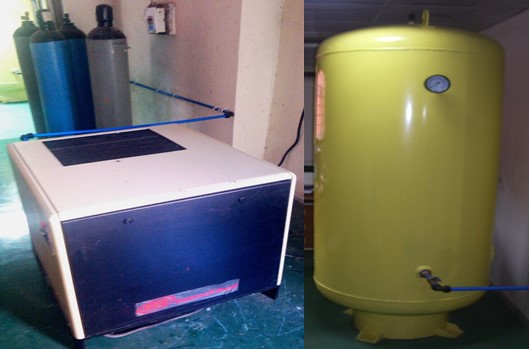
(c) Air compressor system and gas cylinders (d) Air Receiver of 1000 L capacity
Figure 1: Gas Flow Calibration Facility
The various in-house users of Gas Flow Calibration Facility are Chemical Metrology group, Radio and Atmospheric Science Division, Solar Energy group, etc. and external users are Pollution Control Boards, pharmaceutical industries, petrochemical industries, environmental monitoring equipment manufacturers, R&D laboratories, Biomedical laboratories, NABL accredited laboratories, gas flow meters manufacturers, aerospace industries, etc. The various types of gas flowmeters such as mass flow controllers, mass flow meters, rotameters, digital flow calibrators, piston flow calibrators, high precision laminar and sonic flowmeters, orifice flowmeters, totalizer type meters (such as dry gas meters, RPD meters, roots meters) etc. are calibrated using this Gas Flow Calibration Facility.
- The upgraded Primary Water Flow Calibration Facility is fully functional for calibration of different types of flowmeters of sizes DN2 to DN200 in the flow range upto 650 m3/h using weighing method as per ISO 4185 Standard. The new system was completely designed by CSIR-NPL where five pipe lines (DN25, DN50, DN100, DN150 and DN200) have been installed and connected to 3 nos. of high accuracy weighing systems (300 kg, 3000 kg and 6000 kg capacities) through fishtail, nozzle and diverter systems. A separate line of DN15 size has been also derived for calibration of DN2 to DN4 size mass flowmeters using 12 kg weighing scale employing standing start and standing finish method. These weighing systems are of electromagnetic force compensation type. A new direct pumping header of DN150 size was added using 3 HP, 5 HP and 10 HP pumps for calibration of flowmeters upto DN100 size in the flow range upto 175 m3/h. These pumps were integrated with variable frequency drives (VFDs) for flow control and energy saving. Out of 3 nos. of 50 HP pumps, 1 no. of 50 HP pump was integrated with VFD for flow control and energy saving. Figure 1. shows schematic diagram of new Water Flow Calibration Facility through upgradation whereas Figure 2 shows actual photographs. Figure 3 shows the performance parameters of this system.
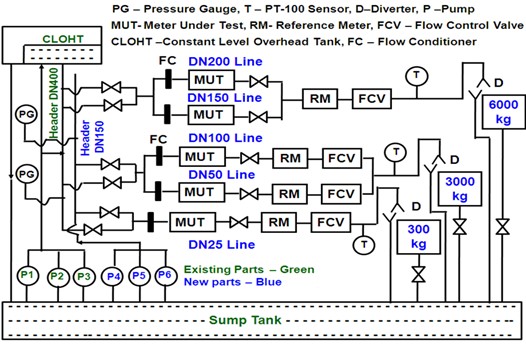
Schematic diagram of New Water Flow Calibration Facility through Upgradation
- Table 1 shows uncertainty budget of magnetic flowmeter calibration using frequency output. The totalized mass, totalized volume, mass flow rate and volume flow rate parameters of flowmeters are measured through this Primary Water Flow Calibration Facility. The uncertainty in flowmeter calibration for totalized mass and totalized volume parameters is in the range of 0.01-0.02% (at k=2) whereas for mass flow rate and volume flow rateparameters is in the range of 0.03-0.05% (at k=2) which are at par to international level. Thus NMI status in water flow area is maintained now by CSIR-NPL.
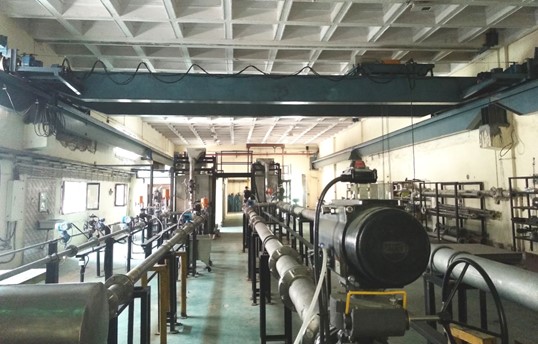
Figure 2. New Water Flow Calibration Facility (New 5 lines along with associated instrumentations)
Table 1. Uncertainty budget of electromagnetic flowmeter calibration in frequency output mode
Sources of uncertainty Flow Rate (m3/h)
[Relative standard uncertainty (%)]
1 m3/h 4 m3/h 7 m3/h 10 m3/h 15 m3/h 1. Weighing tank calibration 0.002 0.0012 0.0012 0.0012 0.0012 2. Resolution (indication) of weighing system 0.0012 0.0005 0.0005 0.0005 0.0005 3. Buoyancy correction, storage and evaporation effect 0.003 0.003 0.003 0.003 0.003 4. Timer calibration 0.0005 0.0005 0.0005 0.0005 0.0005 5. Diverter timing error 0.008 0.009 0.011 0.009 0.017 6. Water density determination 0.001 0.001 0.001 0.001 0.001 7. Frequency Counter 0.00005 0.00005 0.00005 0.00005 0.00005 8. Repeatability (Type A uncertainty) of flowmeter 0.0031 0.0055 0.0094 0.0114 0.0025 Relative combined uncertainty (uc) 0.009 0.0110 0.0148 0.0149 0.0172 Relative expanded uncertainty (U) at k = 2 0.018 0.023 0.032 0.033 0.036 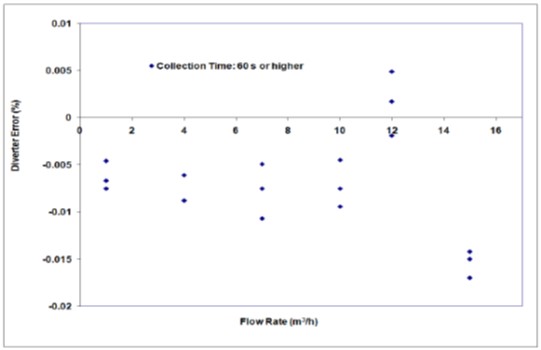
Figure 3. Performance Evaluation of Primary Water Flow Calibration System
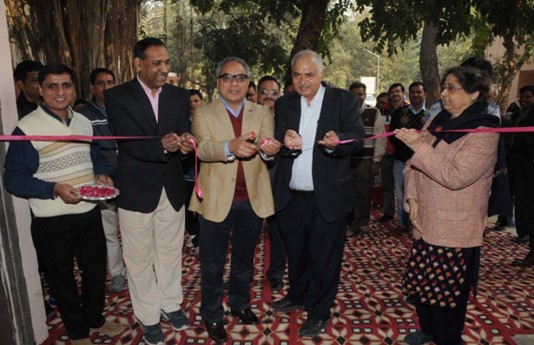
Figure 4. Inauguration of New Water Flow Calibration Facility (Chief Guest: Dr. B.N. Dixit, Director, Legal Metrology Department, Govt. of India)
All Rights Reserved - The Official Website of CSIR-National Physical Laboratory, CSIR, under Ministry of S & T, Govt. of India
Site Designed & Managed by Knowledge Resource Centre
CSIR-NPL, New Delhi
India